What is it?
The Free Gingival Graft (FGG) is a surgical procedure frequently used in periodontics to increase the amount of keratinized tissue surrounding a tooth or a dental implant. Keratinized tissue plays a major role around teeth and dental implants, helping in maintaining and facilitating oral hygiene. This surgical technique was originally introduced in 1966, by Dr. Nabers. The process involved in the healing of this type of gingival graft was further described by the extensive work of Drs. Sullivan and Atkins (oral presentation 1967, in print 1968). Originally, the indications for use of this technique were the most varied. Nowadays, it sums up to a just a few:
Indications for Free Gingival Graft
- Increase of keratinized tissue adjacent to teeth, dental implants or edentulous ridges (the only graft).
- Coverage of certain type of gingival (gum) recessions.
Other surgical techniques (i.e. coronally advanced flap) provide a better esthetic outcome for root coverage procedures. However, this remain a viable option for those cases in which localized factors (such as a frenum) might not allow the direct execution of a coronally advanced flap.
Contraindications for Free Gingival Graft
- Need for an intraoral donor site (a second surgical site).
- High esthetic demand.
The major limitation to the use of the FGG technique is the need for a donor site. Most commonly the tissue is harvested from the palate (the roof of the mouth), but also from edentulous sites (areas with no teeth) or from the maxillary tuberosity (an area behind the last top molar tooth). The second surgical site may increase the length of the procedure, as well as post-operative discomfort. The discomfort can be reduced protecting the area with a stent or a periodontal dressing. I like to use a vacumform stent. To fabricate the stent I use a thermoplastic material, that is vacuum-pressed on the pre-operative dental cast. With this technique I can provide the patient with a thin appliance, that fit tightly and does not alter too much the speech. Periodontal dressing (i.e. Coe-Pack, GC) can also be used, but is more likely to be dislodge during the immediate post-operative days, leaving the patient with an exposed wound.
The esthetic result of the free gingival graft technique can range from very poor to excellent, depending on tissue characteristics proper of each patient. As this is not always predictable, I tend not to use this technique in patient demanding an excellent esthetic outcome. However, a modification to the original technique, recently published by Dr. Cortellini and colleagues (partly epithelialized free gingival graft, 2012), seems to overcome most of the aforementioned limitations.
Step-by-step Procedure
Step 1 – Proper Diagnosis
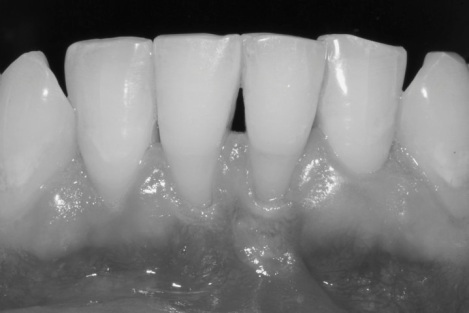
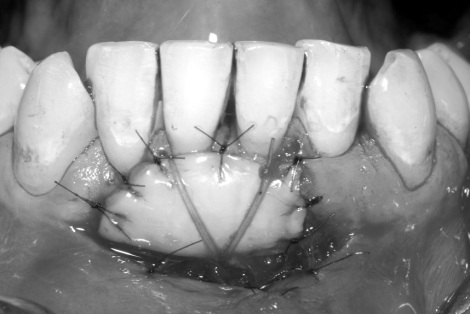
The anterior mandibular area presents minimal keratinized tissue and generalized recessions (Miller Class II-III). The mandibular median frenum is ulcerated due to toothbrushing trauma. The patient was instructed in proper oral hygiene techniques, however no improvement was noted and the patient reported discomfort while brushing. The surgical plan consisted in removal of the mandibular median frenum and increase of the keratinized tissue, in order to facilitate oral hygiene.
Step 2 – Preparation of a Mucosal Bed
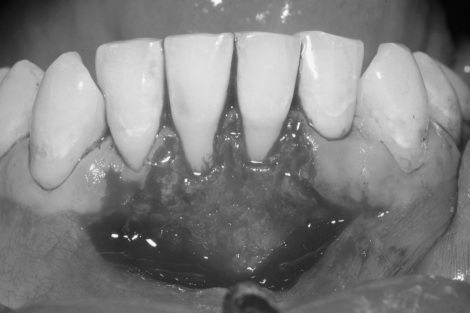
The recipient site is prepared. A mucosal (split-thickness) flap is elevated and reflected past the mucogingival junction. A periosteal bed is left on the recipient site to facilitate suturing. Muscle insertions are completely released (this is critical if we want to achieve attached gingiva).
Step 3 – Harvest the Graft
The gingival graft is harvested from the donor site, in this case the palate (roof of the mouth). Hemosthasis (blod clot) is achieved applying pressure with a sterile gauze. The palate allows to harvest graft of approximately 15-20mm in length and 5-15mm in height, depending on the anatomical characteristics of the palate. The graft is normally harvested from the first molar – canine area. A band of 2-3mm of tissue (>3mm may be required, depending on pocket probing depth) is left around the gingival margin of the teeth, to avoid recession. Injuries to the greater palatine artery do not happen frequently, however the risk exists. In this case prevention is the best medicine, carefully assess the anatomy of the area. The average distance CEJ (first molar) – greater palatine artery is ~13mm (Fu et al 2011), however this change considerably with the anatomy of the palate. A good general principle is: shallow palate – 7mm, medium palate – 12mm, high palate – 17mm (Reiser et al 1996).
Step 4 – Graft Preparation
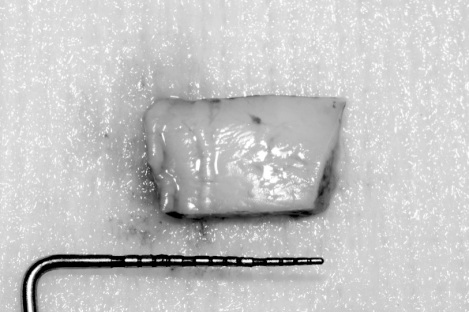
The gingival graft is harvested 15-25% larger than the desired final size. This to overcome primary (immediate) and secondary (during healing) contraction. A thin graft will have less primary,but more secondary contraction. A thick gingival graft will have more primary and less secondary contraction. The graft can be expected to shrink an average of ~20% during healing. The graft harvested from the palate are normally rectangular in shape, the subepithelial tissue is mostly composed by a thin connective tissue layer, adipose and glandular tissue. Adipose and glandular tissue should be removed from the connective tissue surface of the graft, before placement on the recipient site. This procedure can be easily accomplished using a new #15 blade.
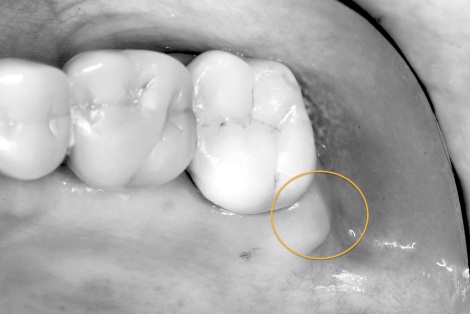
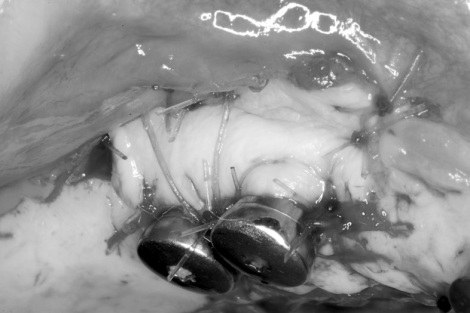
The free gingival graft can be harvested from alternative sites, such as: edentulous areas, buccal areas, or the maxillary tuberosity (as in the above image).
The free gingival grafts harvested from the maxillary tuberosity area have a trapezoidal shape, with the major base showing a more or less pronounced concavity. This type of graft is composed by a thin epithelium supported by a thick fibrous connective tissue. Glandular or fat tissues are normally not present in this area. The size of the maxillary tuberosity varies considerably from patient to patient. The average size of this graft is ~7x10mm.
Step 5- Suture, Suture, Suture
The free gingival graft is finally sutured in place, with a combination of resorbable and non-resorbable sutures. Anchoring periosteal sutures or metal tacks can be used to further stabilize the graft. Absolute immobilization of the graft is the key factor for the success of this procedure. The mucosal flap reflected on the recipient site, can be sutured apical to the graft, or removed (scissors work better than a blade for this operation). The recipient and donor sites are normally covered with a protective stent or a periodontal dressing.
It Works Great With Dental Implants
Sometimes it might be required to increase the width of keratinized mucosa around one or more dental implants. In this cases, the free gingival graft technique is very effective. In fact, with one procedure you can achieve two purposes: vestibular extension (creating more space to fit the toothbrush) and increased of attached keratinized mucosa.
More info about the author: Alessandro Geminiani, DDS, MSc, MS is a specialist in periodontics and dental implants. His practice focuses on free gingival graft (gum graft) and is located in Rochester, NY.



Interesting post!
How about placing the free gingival graft directly on the denuded bone? That will guarantee the “new” gingiva will be attached and not mobile.
Hi Mark!
That is an option. However, I don’t like it too much. The risk of losing the graft increases considerably. I would say a 20% more. Moreover, the healing of the graft will be delayed and resorption of the buccal plate can create a dehiscence or a fenestration. The split-thickness bed is a safer option, and if all the muscle insertions area released you will have attached gingiva.
Thanks
Alessandro Geminiani, DDS, MS
Good morning doctor,
I really hope that you’ll be able to answer my question. My 13 year old daughter was advised by her ortho to have her gum evaluated before braces. We went to see 2 perios. She has very thin gum tissue around 1 or 2 lower front teeth. 1 perio wants to take the graft from where the wisdom teeth will come out and the 2nd from the palate.
I read that the wisdom area doesn’t hurt as much as the palate so it might be better for her but my daughter does not have her wisdom teeth out yet so can we still take it from there or it’s not advised?
I AM SO STRESSED ABOUT IT. PLEASE HELP, PLEASE. We are planning on having it done in 2-3 weeks.
Thank you.
Both areas (roof of the mouth, and/or third molar area) provide a good gum graft. The third molar area is normally smaller and does not provide a lot of tissue. It might be enough for 1 tooth but normally is not enough for 2 teeth. The tissue is thicker and works well to increase thickness of gum surrounding teeth. However for the lower front teeth I still like to use the roof of the mouth because most frequently I end up needing 15-20 millimeters of tissue and that’s too much for the third molar area. It just does not have that much tissue. There are several way to reduce discomfort in the roof of the mouth such as periodontal dressing or even better a custom made acrylic stent. The stent is probably the best.
That is something I encourage you to discuss with your doctor.
If wisdom teeth are not breaking thru the gum yet, there should be no contraindication taking the tissue from there. However if they are very close or partially impacted it is not indicated. The position of the third molar can be assessed with X-ray examination.
Hope this helps. Let me know if you have any question.
hi
i would like to know where do you use non-resorbable suture? and the clear stent used to protect the donor site,what is your instruction for the patient?
Hi Jason,
here is a brief explanation of where I use absorbable and non-resorbable sutures for FGG:
Absorbable sutures: Periosteal sutures (sutures anchoring the graft to the periosteum) These sutures normally remains under the flap and is difficult/impossible to remove.
Cross suture: this suture (normally one) is placed on the recipient site to help stabilizing the graft. I place it after preparing the recipient bed, but before harvesting the graft (I don’t close the knot, I leave it open). Then I place the graft under the cross suture, and I close the knot. This helps stabilizing the graft right away, so that it is deprived of a blood supply for the least amount of time possible. Normally I use 4-0 chromic-gut.
Single interrupted: used to stabilize the graft, as needed, normally 4-0 chromic-gut.
Non-resorbable sutures: Donor site is sutured with 3-0 or 4-0 silk. Single-interrupted sutures can also be used to stabilize the graft. In the case illustrated in this post (mandibular anterior) I’ve used 5-0 nylon, however the majority of the times I use absorbable chromic-gut 4-0.
Instruction for use of the vacuum-formed clear thermoplastic stent:
Do not remove it for 24 hours. At that point, with the stent in place rinse with water, remove the stent and gently brush the teeth but only in the area not treated during the procedure. In the case above it would be maxillary teeth and mandibular posterior. Press firmly a piece of sterile 2×2 gauze on the donor site until bleeding stops. Replace the stent and repeat the procedure every 24 hours. At the 1-week follow-up appointment I will decided if the stent is still needed or not. Most of the time after 7-10 days there is no further need for the stent (this depends on the size of tissue removed and on the speed or re-epithelialization).
Thanks for your question!
Alessandro Geminiani, DDS, MS
Very nice n easily done. U have simplified perio thank you sir
Thanks!
Pingback: Recession Coverage an Evidence-Based Treatment Decision | LovePerio·
hi
i would like to knw the gingiva we cut is keratinized r non keratinized
The tissue taken from the palate is always keratinized.
Thank you for you information. I have a few questions:
1)How thick of a graft do you normally harvest? Does too thick of a graft increase the failure rate?
2)Why is adipose glandular tissue not desired? I imagine it inhibits revascularization. But in cases where a thick “free connective tissue graft” (including palatal periosteum) is used in the maxillary esthetic area and left exposed to regain keratinized tissue, the graft contains these adipose/glandular elements, and it seems to work.
3)If the graft fails, what happens to the recipient bed? Will it remain as attached tissue since the muscle attachments have been removed? Will it become keratinized?
Thank you!
Hi Carl,
thanks for your questions.
1) I normally harvest ~1mm graft. A thick graft has more primary contraction (not a big issue) and is harder to mask esthetically. The color is normally whiter (more pale) than the tissue where it is transplanted to. This color discrepancy takes longer to disappear.
2) Glandular and adipose tissue create color discrepancies hard to mitigate and it may inhibit vascularization if it is abundant but I’ve never incurred in such problem.
3) If the graft fails, the recipient site will regenerate, and the phenotype of the regenerated tissue will depend upon the genotype of the surrounding area. If the recipient site is all mucosa, there will not be any keratinized tissue (gingiva) forming.
Attached or not attached will depend on the presence of muscular fibers and the genotype of adjacent tissues, however, in my experience, it is almost always a combination of both, with the attached component prevailing. The most coronal part (towards the tooth) reforms as attached gingiva (keratinized tissue) from the gingiva surrounding the adjacent teeth. The apical part (towards the vestibule) would be expected to be movable, but frequently I find it to be a “scar” kind of tissue, pretty stable.
Thank you!!
thanks for great site. question: fgg in area of scar tissue prior to block graft?
I’m not sure I understand the question. However if you question is: can FGG be placed in area of scar tissue, before proceeding with a block graft? The answer is yes. Is actually the most predictable technique to get rid of all that scar tissue that would make the outcome of block grafting less predictable. Another technique could be using a soft tissue laser to ablate the scar tissue, however this technique frequently requires repeated ablation 4-6 weeks apart from each other.
Thanks
How important is the knowledge about accurate gingival thickness (biotype) in the donor/placement area for you?
For this type of procedure (Free Gingival Graft) the tissue biotype of the recipient site has a very minor influence. Having an idea of the thickness of the donor site might facilitate the harvesting process, however the best information are obtained during incision and initial flap reflection. In my experience, that is the only time I can properly evaluate the amount of glandular/fat tissue and decide how “deep” harvest my graft.
For other procedure, such as root coverage with connective tissue graft, knowing the biotype of the recipient site plays a major role. Very thin biotype is more difficult to handle, reposition and suture.
Thanks
Good morning doctor,
I really hope that you’ll be able to answer my question. My 13 year old daughter was advised by her ortho to have her gum evaluated before braces. We went to see 2 perios. She has very thin gum tissue around 1 or 2 lower front teeth. 1 perio wants to take the graft from where the wisdom teeth will come out and the 2nd from the palate.
I read that the wisdom area doesn’t hurt as much as the palate so it might be better for her but my daughter does not have her wisdom teeth out yet so can we still take it from there or it’s not advised?
I AM SO STRESSED ABOUT IT. PLEASE HELP, PLEASE. We are planning on having it done in 2-3 weeks.
Thank you.
Hi! I have just had a gum grafting that failed. It is on a bottom front tooth. I was advised to see a perio before orthodontics, and the perio advised for a gum grafting. I also had ortho 16 years ago and had to have a gum grafting then, same tooth. My questions are: what’s the possibility of it failing a second time? will all these surgeries further complicate and degenerate my gums, especially if it fails a second time? why would it take a second time but not the first?
It is hard to predict what will be the chances of the second gum graft failing without seeing the area.
It is possible the additional surgeries might compromise the integrity of your gums, specially if they keep failing.
Again it is not possible to tell if a gingival graft will work or not without seeing the area.
There are several factors that play a role in the outcome of gum grafting. Sometimes teeth are in an unfavorable position and that has to be addressed first before orthodontics. Sometimes tissue is very thin and friable and you need to strengthen it with a gum graft before orthodontics.
If you are going through a second cycle of orthodontics and gum grafting (maybe even a third gum graft) you want to make sure this treatment focuses on function and not only esthetics. You should aim for a long-term stable functional result.
I agree. That is what my goal is. Is there anyway I can send you a picture?
You can use the contact form on the website. But I also sent you an email.
very beautiful method to explain sir.
Sir whats d predictability and rationale of using free dentogingival unit in case of graft.
and yes in ur personal opinon SCTG OR FGG which is best
Thanks for the nice words.
I don’t understand very well the “free dentogingival unit”
Connective tissue graft is better when the goal is recession coverage (and esthetic).
Free gingival graft is better when the goal is increase of keratinized tissue, or vestibular extension.
Sir, thank you for clearing my doubt.
Dentogingival unit is nothing just a modification of free gingival graft..also known as free gingival unit.
i used DGU and getting good results whether in recession coverage or in increasing attached gingiva.
check the article below as well
regards
http://www.ncbi.nlm.nih.gov/pmc/articles/PMC4550001/figure/F1/
Hi,
Based on my classic literature research, free gingival graft placed on denuded bone actually has decreased inflammation and decreased graft shrinkage compared to the FGG placed on periosteum. Please refer to classic studies by Dr. James: http://www.joponline.org/doi/abs/10.1902/jop.1978.49.6.283?url_ver=Z39.88-2003&rfr_id=ori:rid:crossref.org&rfr_dat=cr_pub%3dpubmed
http://www.joponline.org/doi/abs/10.1902/jop.1978.49.6.291?url_ver=Z39.88-2003&rfr_id=ori:rid:crossref.org&rfr_dat=cr_pub%3dpubmed
can you post articles and steps of suturing techniques for mucogingival surgeries
What is the Mechanism of graft heal with recipient tissue?
Hello. It is a great site to get ideas. I started an implant procedure last year after two years of Ortho to straighten my teeth and first I needed to have some bone graft first which took place last Spring followed by an implant in the Fall. I was suppose to have my healing abutments placed in March 2017 but I got sick so the next available date was May 30th. When I saw the dentist he recommended that I have gum graft before placing the healing abutments. I am now confused what to do because this means further delay and I am worried about doing the FGG and risking the failed implants. What is your opinion?
thank you so much for such a nice case .sir my question is if there is no attach gingiva around 3 implant placed near (34,35,35)and want to gain attach gingiva what you suggest
free gingival graft or sub epithelial connective tissue graft ?
Unfortunately both procedure are very unpredictable around dental implants.
in the past I thought the free gingival graft would have worked more predictably, but lately I’ve changed my mind and I prefer to do a sub epithelial connective tissue graft.
It is not uncommon to have to repeat the procedure 2-3 times to get the ideal result.
This is a dilemma that I sometimes face. There is recession on an anterior tooth, with little or no attached gingiva remaining. On palpation I can feel the bulge of the root which has penetrated the labial plate of bone under thin mucosa. If I dissect the mucosa there will be little if any vascular tissue over the root, so a free gingival graft will not survive. I am also afraid of damaging or perforating this thin friable mucosa by doing a subepithelial connective tissue graft. What method do you use for this? Do you ever choose not to treat it? Thanks.
Yes, that is a challenging situation. I can recall many cases in which I’ve decided not to treat, in particular it the area has been stable over time.
For the more challenging cases, I reflect a full thickness flap, place an epithelialized graft (free gingival graft) then I placed the flap right over it, as if it was a connective tissue graft. The flap eventually shrinks to the level of the most apical part of the epithelialized graft (sometimes there are tags or scar tissue left behind and it might need some sculpting), but it seems to protect the graft in those challenging cases.